
We are all used to having physical devices to test our applications, which are indeed a quicker way as they give us hands-on experience. However, they also consume a lot of desk space and electricity, and not to mention needing charging wires. What if I tell you that there is a way to use multiple devices just with a single laptop? Yes , I am talking about Emulators.
Emulators – an Overview
Emulators are basically virtual machines that help us to run any software application without the need for different hardware devices. Despite their limitations emulators have, we have benefited from these in various ways.
How are Emulators better ?
- We are able to test on the new Android OS even before the physical devices hit the market
- Setting up takes very less time
- One can use multiple devices together on a computer
- On comparing to online device farms , emulators are lag free and do not exhibit any delays in executing testing scenarios
- They take up zero desk space when compared to physical devices
- They are free to use and do not require a subscription
- One does not need to depend on another colleague for device requirements
- Emulators can also be used to run Automation Testing
Now that we learnt some of the benefits of the emulators , lets learn more about setting them up.
There are many open source, freeware applications which allow us to download emulators like Memu, nox, bluestacks, LDPlayer, etc., but we will discuss Android Studio in this blog.
Prerequisites
- Latest Android Studio
- Command Line Tools
- Setting up of environmental variables
- Enabling virtualization on your Laptop/PC
Downloading Emulators
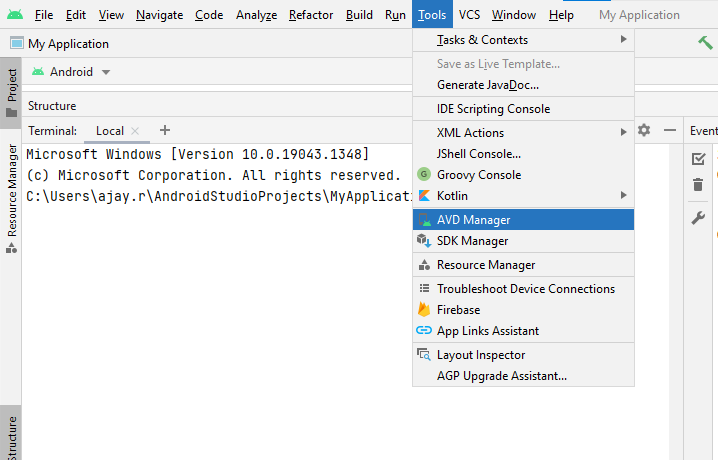
Once all the prerequisites are met, launch Android Studio and Navigate to Tools -> AVD Manager.
Or you can launch AVD Manager by clicking on this icon on the right hand corner of Android Studio.

Once the AVD Manager is Launched click on Create Virtual Device.

The following window will be displayed. You can download your desired emulator from there.

Before you download your very first emulator, let me tell you about the few that I majorly use to test applications.
First one is the Generic Emulator which supports Google Play Services and the second is a Signed Emulator which supports platform signed applications.
Setting up a Generic Emulator
From the window depicted below, choose any desired device and screen size. Make sure there’s a Play Store icon next to it to indicate that the device will support Google Play Services
For Example: I will be choosing Pixel 4 with the Google Play Icon

Click on Next and choose the desired Android Version for your emulator from the recommended section. I have chosen Android R here.

If your desired Android Version is not available in the recommended section, you can choose from x86 Images. However, please ensure that any generic emulator image you choose hasGoogle Play written next to it in the target section. This indicates support of Google Play Services.

Click on Download, and wait for the image to download. Hit Finish once the download is complete. Select the downloaded Image and click Next.

In the window depicted below, enter the desired name for your emulator and click Finish.

Your very first emulator is now created.
Click on the play button to Launch your emulator, and your Generic Emulator is now ready to use.

Setting up a Signed Emulator
As discussed earlier Signed Emulators help us in using Enterprise Agent for our SureMDM Agent and SureLock testing.
From the below window choose a device which does not contain the Play store logo, which indicates that there is no support for Google Play services.

Click on next and select an Image from x86 Images , always make sure for Signed Emulators the Image should contain only the Android Version written in the Target section , (Google Play) or (Google APIs) should not be written next to it.

Download the required Image and click on next , the next steps remain the same as the Generic Emulator setup process. Give a desired name to the Signed Emulator and hit finish.
Once the Emulator is created click on play and your very own Signed Emulator is ready to use. You can note that there are no Google Applications present in your signed emulator.

Installing Applications on Emulators
You would be very surprised to learn that installing applications on the Emulator is very simple, you just need to drag and drop the apk file to the emulator. Once installed, the application can be normally used just like on a physical device.

You can also use the below adb command to install applications
adb install <folder path>*.apk
Can Emulators be helpful in Application Testing ?
Now that we have learnt the benefits of emulators and how to set up different types of emulators and how to install Applications on them , it is very obvious to say that Emulators are very helpful in our Testing Process.
We do not have to depend on our team mates to use their devices for testing , we can easily set up multiple different Emulators for different Android Versions and use them.
They also save a lot of time and desk space, a tiny drawback is such that we may not be able to test physical scenarios such as charging or bluetooth sharing etc., but I do believe they are a very small portion of the scenarios.
To sum up, Emulators go hand in hand with mobile application testing and no one can neglect the fact that it does bring more efficiency and effectiveness in the whole process.