
Validating an application as an Android application tester is a prolonged task that includes checking various scenarios and functionalities all the time, but what if one can save a lot of time during the whole testing cycle. Yes, this can be done with simple and easy-to-use ADB commands.There are several ADB commands that can help achieve extraordinary results that can not be delivered by hardware buttons or software functionalities present in your Android phone.
First of all, let’s understand what ADB commands are. ADB stands for Android Debug Bridge, which is a command-line tool that helps users to communicate with Android devices.There are some prerequisites mentioned below that are required to be followed before using ADB commands.
- Allow USB debugging for the Android device
-Launch the settings of your phone.
-Search for the “About Phone” section and tap on it.
-Now tap on the build number seven times to enable developer options for your phone.
-Go back to the main settings. A new developer options menu will be displayed. Tap on it and enable the USB debugging option.
The next step is to set up ADB for the Windows machine so that it can communicate with the device.
- Setup ADB on your Windows machine.
-Download the Android SDK Platform tools zip file and extract it.
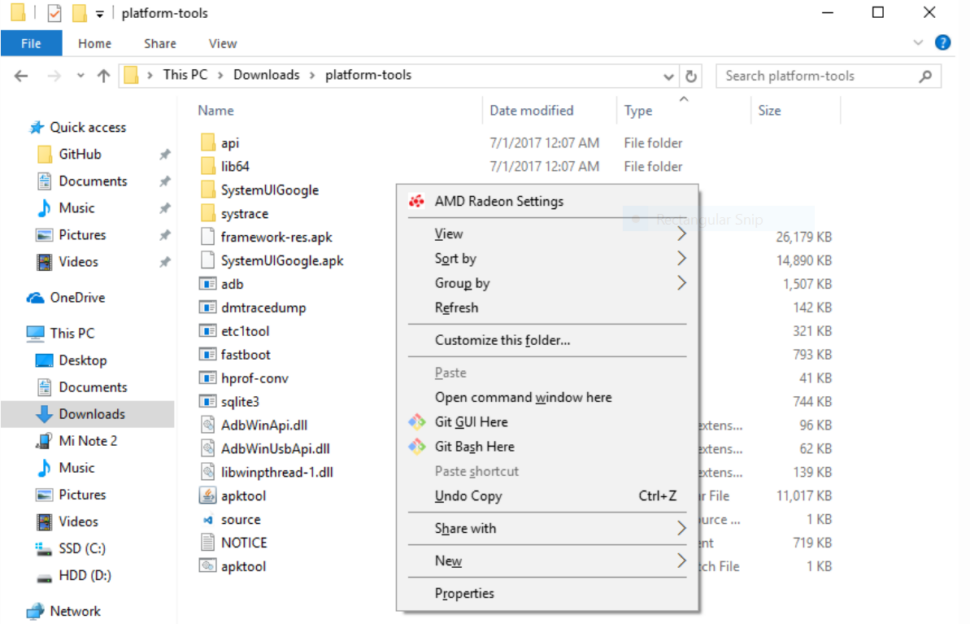
-Browse to the location where the contents of this zip file are extracted. Now, open the command prompt by holding the shift key and right click within the folder, then click on “Open command window here” as shown below.
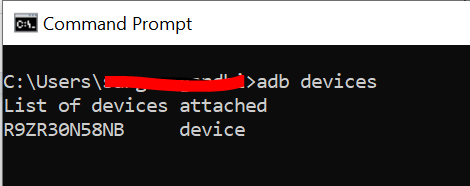
-The previous step will open the command prompt there only. Now, connect your Android device to the Windows machine using a USB cable and type this command – “ADB devices” on command prompt then press Enter.
-On the phone screen, a prompt will be displayed to allow or deny USB debugging. Tap on the allow button to allow USB debugging.
-Again send the “ADB devices” command from the command prompt to verify that the device is finally connected to the Windows machine via ADB. It will be seen as shown below.
Ultimately, both the Android device and Windows machine are compatible to use ADB commands.
Let us now explore some amazing ADB commands for Android devices. Remember, that while using these ADB commands, the device needs to be connected to the Windows machine all the time and USB debugging should be kept enabled on the mobile device.
One can easily install or uninstall an application for any Android device in no time with the help of these ADB commands. Also, as an Android application tester we often need to install apks which are not yet released on playstore or other websites. In that case these ADB commands can help install any file with the .apk extension even if it’s still under development.
For installation, type this command on the command prompt and then press Enter to install the apk file which is stored in the mentioned folder path.
- ADB install <folder path>*.apk
Similarly, for uninstalling the apk, type this command on the command prompt and then press Enter.
- ADB uninstall <package name>
If the device’s power button is not working and you want to reboot the device, there is an ADB command that can reboot your device without the use of any hardware keys.
- ADB reboot
Pulling and pushing files is also a laborious task, and manual software testers have to do this daily. Here are a few ADB commands that can make things easy.
One can pull files from an Android phone to the Windows machine using the following ADB command. This may even help to pull out the whole gallery folder at once.
- cd desktop (This will save the pulled files on the desktop)
– ADB pull sdcard/DCIM (This will pull the whole DCIM folder to your desktop in one go).
Now, for pushing the files from your desktop to the Android phone, use the command shown below
- ADB push <path/filename> /sdcard/
Just replace the path/filename with the location where the files required to be pushed are stored on the desktop.

If you need to factory Reset a device,there is an ADB command that can help you take full data backup..
- ADB backup -all -f /backup/location/file.ab
This one will create a backup of your phone storage on the Windows machine. You just need to mention the location to store the backup at your desktop, and it’s done.
Say no to other third party apps to record the screen of your phone. With the help of the below-mentioned command, you can record the screen of your device for around 3 minutes.To stop the screen recording press CTRL+C on your keyboard.
- ADB shell screenrecord <path/filename.mp4>
The following command can be used to take a screenshot.
- ADB shell screencap -p <path/filename.mp4>
To save these screen recordings or screenshots on your desktop, use this command:
“ ADB pull /sdcard/<Filename.mp4>”
Sometimes, as a tester, it’s important to gather small but key details about the device like serial number or Android version. The following commands can help.
- ADB get-serialno
Usually, the serial number is at this location “Settings > About Phone > Status” under Device Settings.This command reduces the number of steps.
The following command will let you know the Android version of the device that you are using.
- ADB shell getprop ro.build.version.release
We all encounter ANR(App Not Responding) screens while using Android apps. Collecting resources to analyze the reason behind these ANRs is hectic and not-so-efficient task. Fortunately, there are ADB commands for that also. Once you observe any ANR, use these commands immediately to capture Bugreports, traces and logs.
- ADB bugreport ./bugreport.zip: For Android Pie and above, this command will create a .zip file consisting of all the files required in bugreports.

- ADB pull /data/anr/traces.txt: For versions below Android Pie, this command will create a .txt file for traces.

- ADB logcat > logcat.txt: This creates a .txt file that consists of logs, which can be very helpful in determining why an ANR issue occurred.

Note:- All the files (including .zip,.txt) that were generated using above ADB commands will get stored at “C:\Users\<file_name>” location of your desktop.
Conclusion
ADB commands are crucial for establishing a channel of communication between an Android device and a Windows machine.The user can do a lot of things with the help of such commands,which can help save both time and effort. To sum up, ADB commands go hand-in-hand with mobile application testing and no one can neglect the fact that it does bring more efficiency and effectiveness into the whole process.
November 30, 2021Very nice information, Every Test Engineer must know these commands for effective / cost cutting testing.