For businesses embracing zero-trust principles, secure certificate-based authentication isn’t just nice to have—it’s a necessity. With Okta as your Identity Provider (IdP) and SureMDM as your unified endpoint management solution, you can now seamlessly distribute and manage device certificates using Simple Certificate Enrollment Protocol (SCEP).
This blog will guide you through:
- Why use SCEP Certificate with OKTA and SureMDM
- Step-by-step guide to configuring SCEP in Okta
- How to configure OKTA SCEP CA server with SureMDM
- Real-world examples and use cases
Why Use SCEP with Okta and SureMDM?
SCEP allows for secure, scalable, and automated issuance of device certificates. When Okta is configured as a CA and SureMDM manages the device endpoints, this integration brings the best of both identity and device management together. The integration is supported for multiple platforms.
Benefits:
- Automates certificate enrollment and renewal.
- Secures Wi-Fi, VPN, and app access without passwords.
- Reduces manual overhead for IT teams.
- Ensures consistent certificate policies across the device fleet.
- Supports compliance and audit requirements with centralized logging and control.
Step-by-step guide to configuring SCEP in Okta
Step 1: Configuring SCEP in Okta
Here’s how to prepare your Okta environment to issue certificates via SCEP:
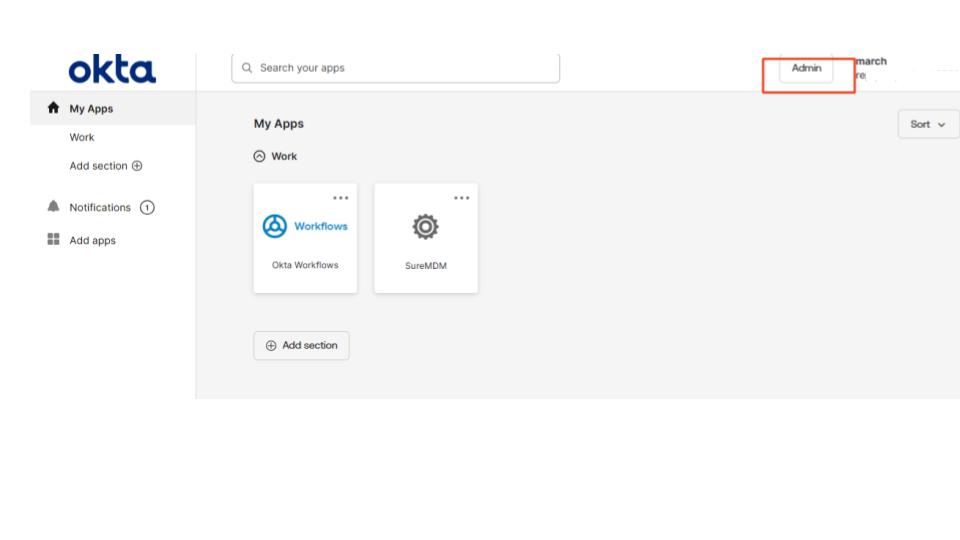
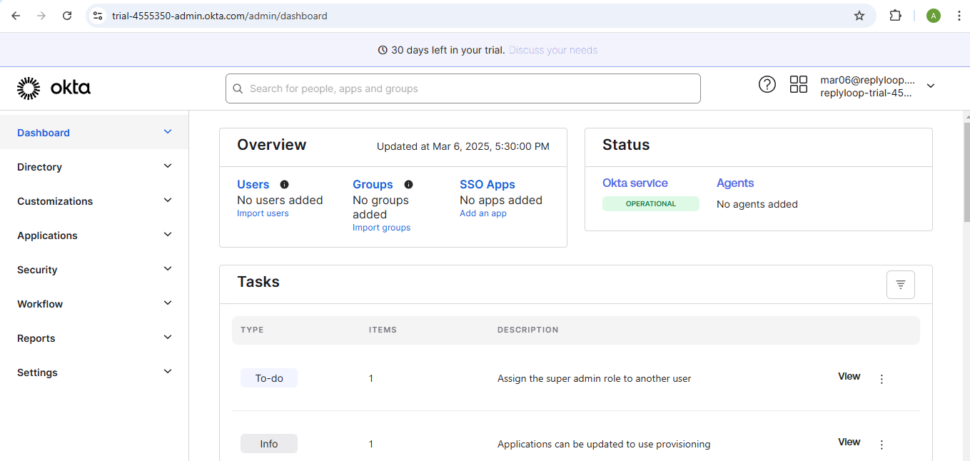
Log in and Access Admin Settings
- Log in to your Okta portal
- Click on the Admin button in the top-right corner to open the Admin Console
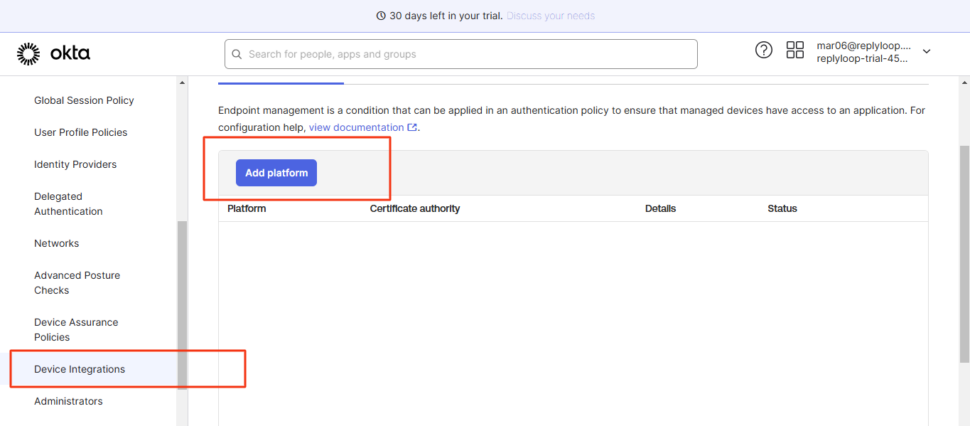
Navigate to Device Integration Settings
- Go to Security → Device Integrations
- Click on Add Platform
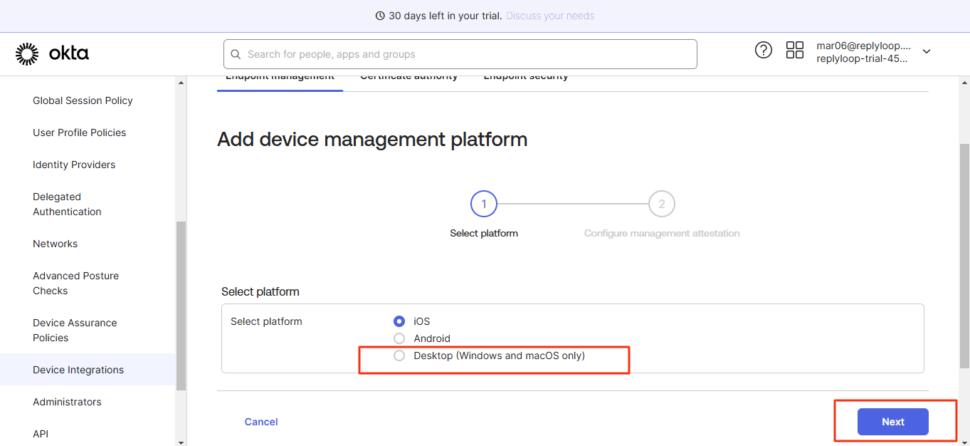
Configure the Platform for Certificate Distribution
- In the setup wizard:
- Choose Platform Type as:
Desktop (Windows and macOS only) - Click Next
- Choose Platform Type as:
- For SCEP URL Challenge Type, select:
- Static or Dynamic depending on your organization’s security preference
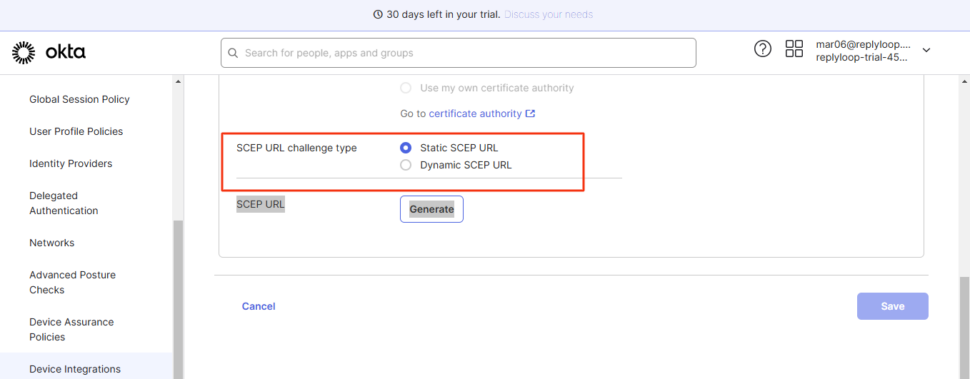
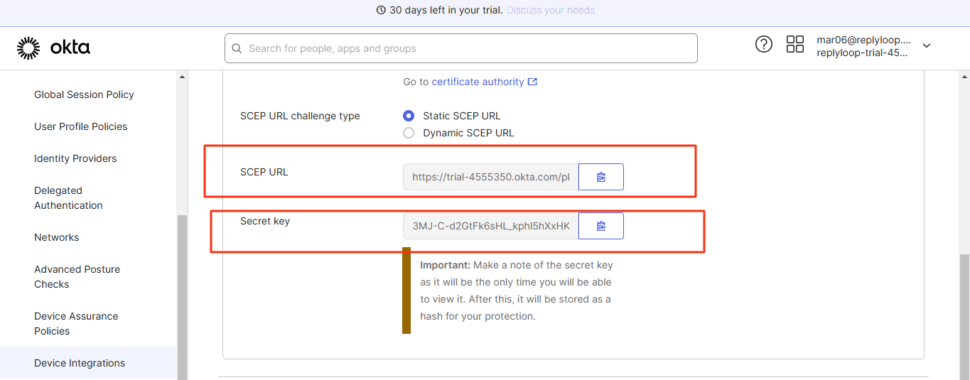
Generate and Save SCEP Configuration
- Click Generate under the SCEP URL section
- Copy the SCEP URL and Secret Key values shown
- Click Save to finalize the SCEP platform configuration
You will use these SCEP values (SCEP URL & Secret Key) while creating a certificate profile in SureMDM.
Step 2: Configure Certificate Management in SureMDM Account Settings
As part of the SCEP integration process, certificate management must be configured at the SureMDM account level. This setup defines how SureMDM will communicate with the Certificate Authority (CA) using the details provided by Okta.
Follow these steps:
1. Access Certificate Management Settings
- Log in to the SureMDM Web Console
- Click the Settings (gear icon) in the top-right corner
- Navigate to Account Settings → Certificate Management
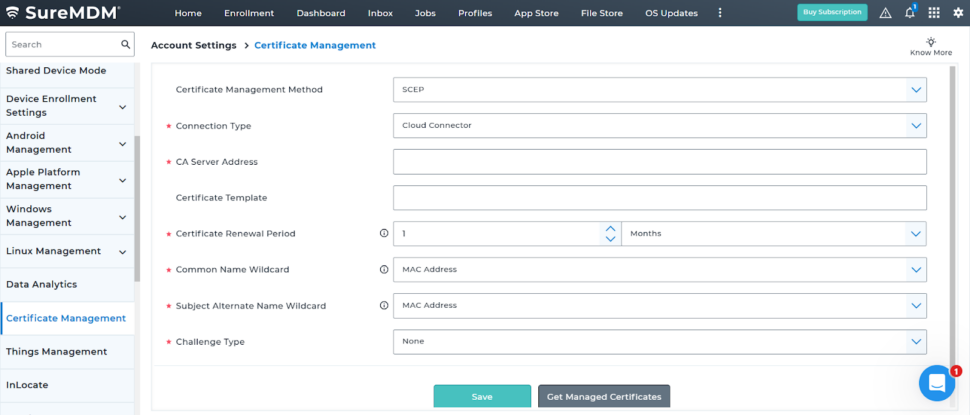
2. Fill in Certificate Authority Details
Provide the following values:
- Certificate Management Method: SCEP
- Connection Type: Cloud Connector
- CA Server Address: Enter the SCEP server address provided by Okta
- Certificate Template: Enter the name of the certificate template configured in Microsoft CA
- Certificate Renewal Period: Set certificate validity duration
- Common Name Wildcard: Select one of the following:
- MAC Address
- IME
- Device ID
- Serial Number
- Custom Wildcard/Values — for example: cn=%emailaddress%
- Subject Alternate Name Wildcard: Select one of the following:
- MAC Address
- IMEI
- Device ID
- Serial Number
- Custom Wildcard/Values
- Challenge Type: Select the same option as configured in Okta under the “SCEP URL Challenge Type” — either Static or Dynamic
💡Important: The Challenge Type must exactly match what was configured in Okta’s SCEP URL Challenge Type setting. Mismatched settings can cause certificate requests to fail.
3. Save the Configuration
Once all required fields are filled, click Save to finalize the certificate authority connection at the account level. This config will now be referenced in your platform-specific profiles.
Step 3: Creating a SCEP Certificate Profile in SureMDM
After setting up Certificate Management in Account Settings, the next step is to create a certificate profile for Windows devices. This profile uses the SCEP configuration defined earlier and deploys certificates to targeted devices.
Here’s how to set it up:
Navigate to Profile Section
- Log in to the SureMDM Web Console
- Go to Profiles from the top navigation
- Select Windows as the platform
- Click on Add to create a new profile
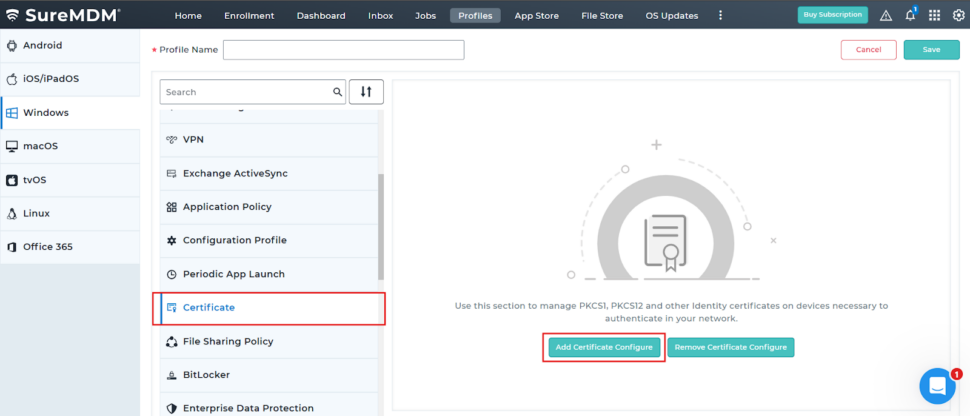
- Choose Certificate from the list of available payloads
Add a SCEP Certificate Configuration
- Click on the Add Certificate Configure button
- A configuration popup will appear
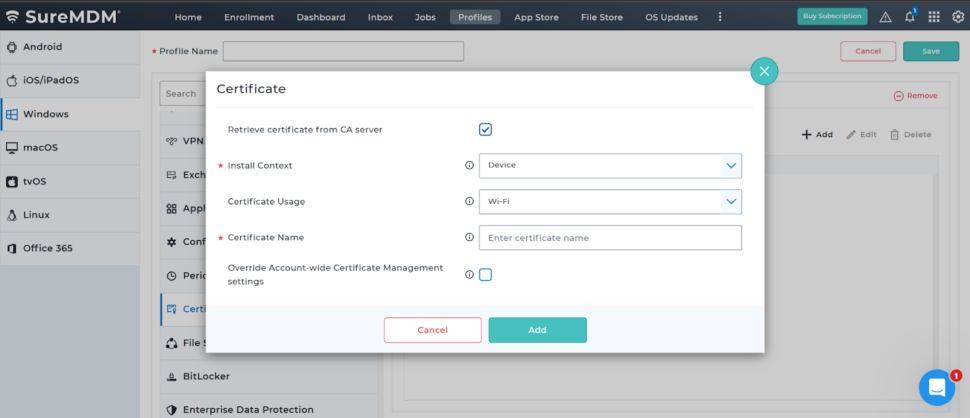
- Check the box “Retrieve certificate from CA server” to enable SCEP-based configuration
Now fill in the following details:
- Install Context: Choose either Device or User
- Certificate Usage: Select Wi-Fi or General
- Certificate Name: Enter a label for this certificate
Once configured, saving and deploying the profile will initiate certificate requests to the Certificate Authority based on configurations at Account Settings → Certificate Management and install the certificate on all targeted devices.
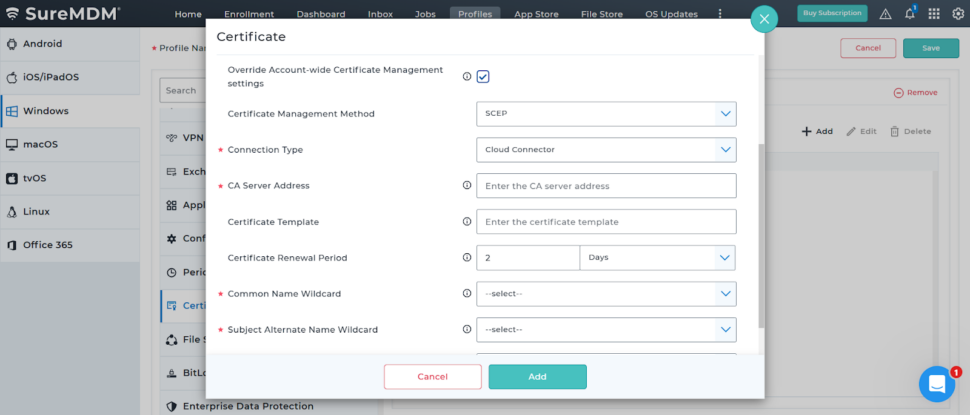
Override Account-wide Certificate Management Settings (Optional)
If the certificate authority is different from the one defined in Account Settings → Certificate Management then follow below steps to deploy certificate using specific Okta configurations:
- Check the box labeled “Override Account-wide Certificate Management settings”
Once checked, the configuration is similar to Step 2 (Certificate Management section) configurations. These include:
- CA Server Address
- Certificate Template
- Certificate Renewal Period
- Common Name Wildcard
- Subject Alternate Name Wildcard
- Challenge Type, and more
This allows admins to define and deploy alternative certificate configurations directly within the profile, without affecting the global account-wide settings.
💡 This is especially useful when you need to deploy a certificate from a different Certificate Authority (e.g., Internal CA vs External CA or department specific certificate templates) that hasn’t been configured globally.
Step 4: Deploy and Monitor
Assign this profile to Windows devices or groups. Devices will:
- Request certs from Okta via the SCEP endpoint
- Receive and install them silently
- Use the certs for secure access (e.g., Wi-Fi, VPN)
- Monitor and track the certificates issued and pending renewal at Account Settings → Certificate Management → Get Managed Certificates.
Real-world examples and Use Cases
Here are some practical scenarios where this integration adds real value:
Wi-Fi Authentication Without Passwords
Deploy certificates to authenticate devices to enterprise Wi-Fi networks (e.g., 802.1x, EAP-TLS, EAP-PEAP and WPA3-Enterprise) — no more shared keys or user-driven setups.
VPN Access Control
Use certificates to authenticate managed devices into VPN tunnels. Certificates ensure only enrolled, compliant devices can connect.
Zero-Touch Device Provisioning or User-less devices
During device onboarding (OOBE, Autopilot, Automated Device Enrollment (ADE/DEP) or Zero-Touch Provisioning (ZTP)), automatically install identity certificates via MDM + SCEP, allowing secure app access from day one.
School/Education Use Case
In the education sector, securely connecting student laptops to Wi-Fi networks without manual setup or sharing passwords enhances security and student experience while keeping IT overhead low and securing the setup.
BYOD and Contractor Scenarios
Certificates can be short-lived and automatically revoked, making them perfect for temporary users or unmanaged endpoints that still need secure access.
Compliance and Reporting
With centralized control and visibility in SureMDM and Okta, IT admins can demonstrate certificate-based access enforcement during audits.
Final Thoughts
The Okta-SureMDM SCEP integration enables IT teams to automate and strengthen authentication workflows, making device trust as scalable as identity management.
This integration between Okta + SureMDM using SCEP unlocks:
- Seamless and secure certificate issuance
- Passwordless device authentication
- Better compliance and device hygiene
- A strong foundation for Zero Trust security
Whether you’re running a large enterprise or a mid-sized educational institution, this setup helps you meet the demands of secure access, minimal friction, and efficient device provisioning.