
Hello folks!!
We are developing a configurable .NET Core application here. If you were wondering how to make a .net core application configurable, then you are in the right place.
What is a configurable .NET Core application?
In .NET Core applications, configurations are stored in key : value pairs, which can be read at runtime from various parts of the applications.
What will our SampleApp do?
In this guide, we will be developing a small console application which will be configurable. Firstly, we will be adding a configuration file, appsettings.json. Further, we will be making it configurable. Finally, we will be seeing how those values from our appsettings.json are being fetched and used in the code. This application will take the Name, Age and Email of a person from the appsettings.json and print :
Hello!
I am <NAME> and I am <AGE> years old
Contact me at <yourname@domain.com>
Contents :
- Prerequisites
- Creating the Application
- Adding appsettings.json
- Making The appsettings.json configurable
- Extracting the values in appsettings.json from our application
- Using the values from appsettings in our code
- Conclusion and Output
Prerequisites
- Visual Studio(2017 0r 2019, I am using 2019)
(link : https://docs.microsoft.com/en-us/visualstudio/install/install-visual-studio) - .NET Core SDK
(link : https://dotnet.microsoft.com/en-us/download)
So, what are we waiting for? Let’s begin!!
STEP 1 : Creating the Application
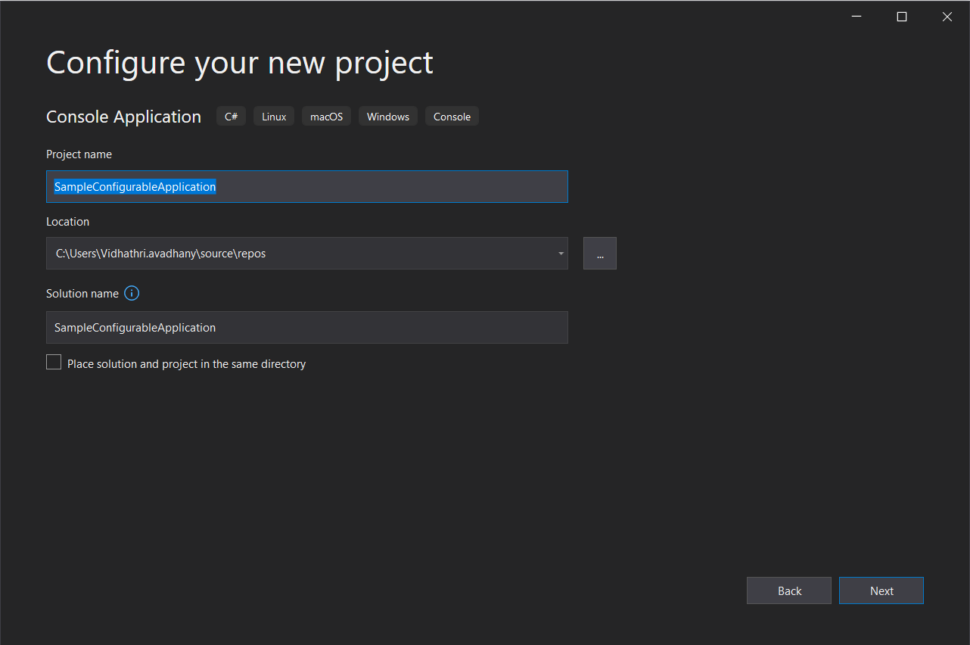
Create a new project through Visual Studio 2019 and select Console Application in .NET Core framework for creating the project, further, follow the steps as shown.

Let’s give an appropriate name to our project and select an appropriate framework. I have chosen .NET Core 3.1, but its totally up to you.
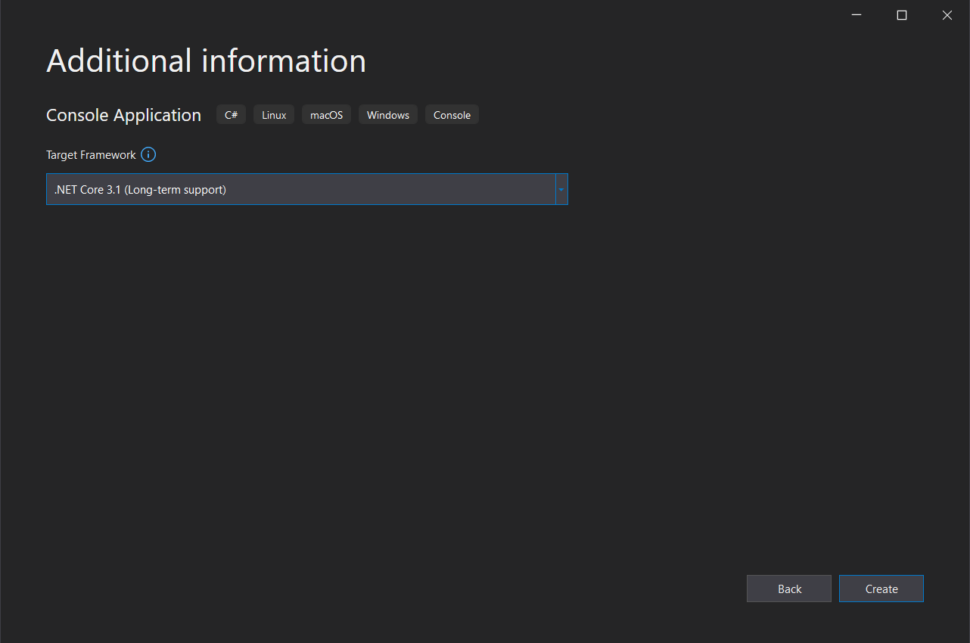
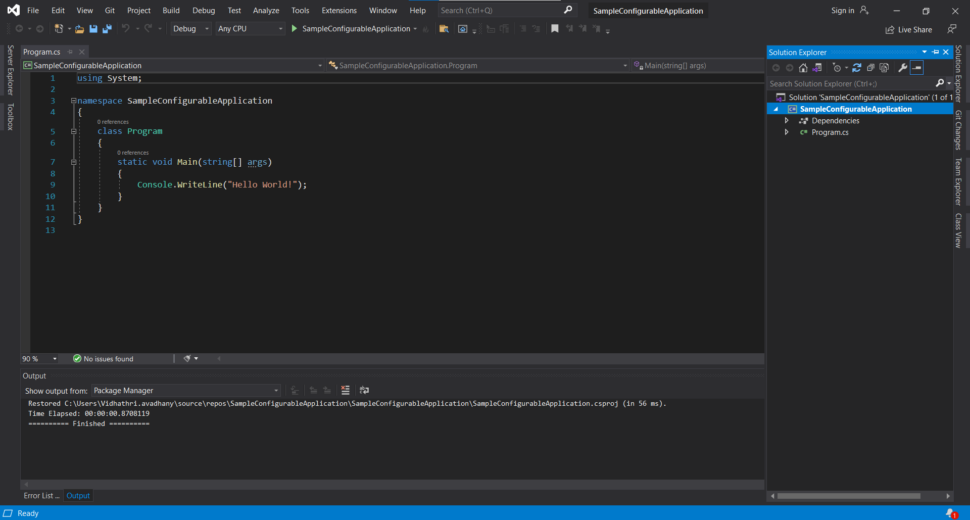
Here is what you get when you hit on create.
STEP 2 : Adding appsettings.json
Now, let’s add the appsettings.json file and add a few key : value pairs into it.
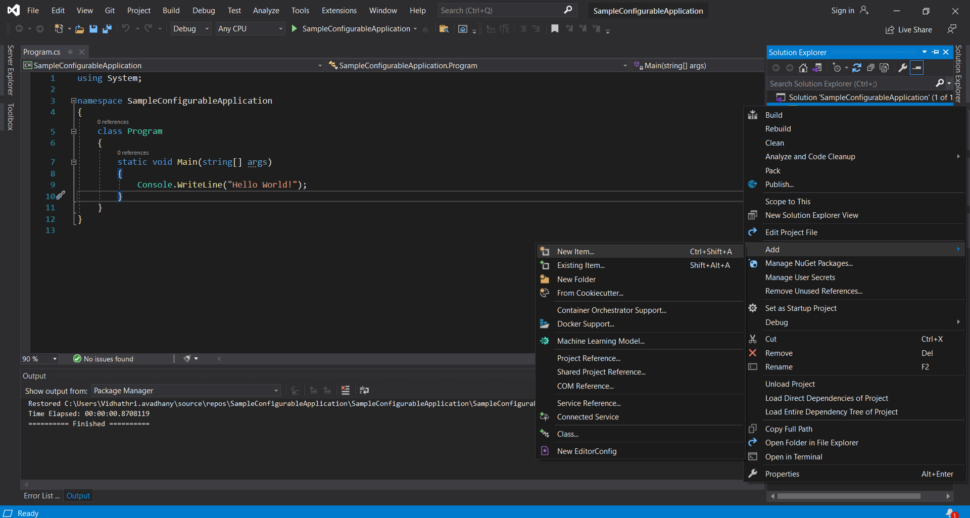
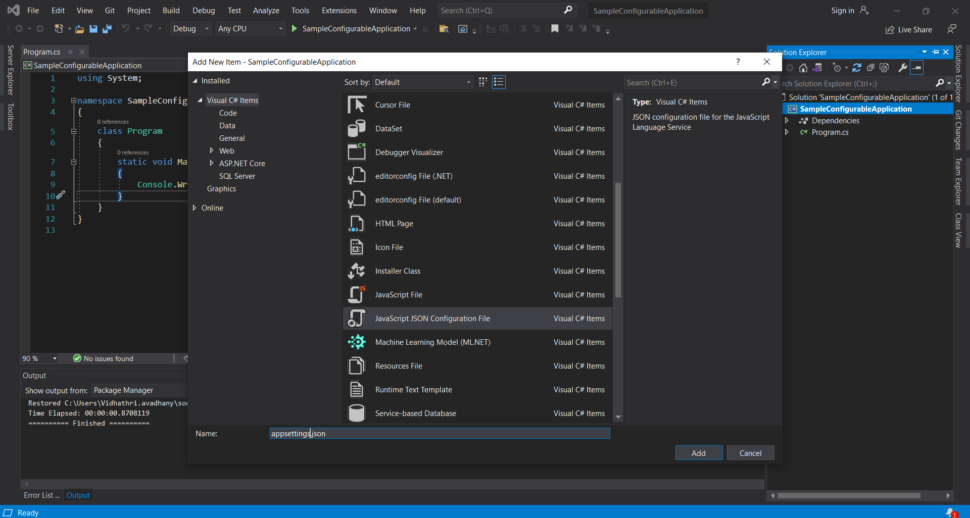
From the solution explorer, add a new json file and name it as appsettings.json(Right click on the project name>Add>New Item).
STEP 3 : Making The appsettings.json configurable
Our next step is to make the appsettings.json configurable. For doing the same, right click on appsettings.json and click on properties. Change the ‘Build Action‘ to ‘Content‘ and ‘Copy to Output Directory‘ to ‘Copy if newer‘. As a result the content of appsettings.json will be retained even after building the application and we can use this for making our application configurable.

Now let’s put some key : value pairs in our appsettings.json. So, copy the following into your appsettings.json file.
{
  "Name": "XYZ",
  "Age": 32,
  "Email": "xyz@abc.com"
}
STEP 4 : Extracting the values in appsettings.json from our application
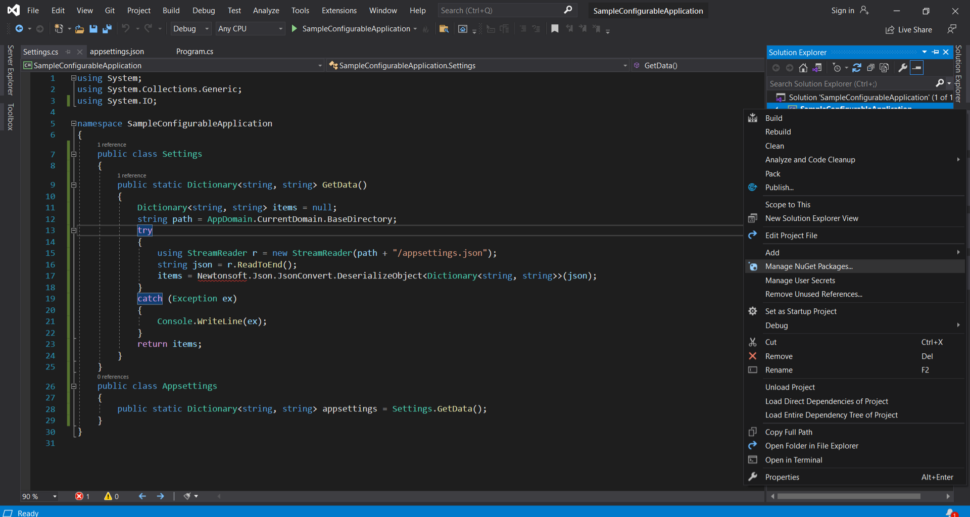
Further, let’s see how these values can be extracted and finally use them in our application. So, to extract these values from the appsettings.json file, let’s create another .cs file and name it as Settings.cs. You can copy the following code snippet into your Settings.cs file.
using System;
using System.Collections.Generic;
using System.IO;

namespace SampleConfigurableApplication
{
    public class Settings
    {
        public static Dictionary<string, string> GetData()
        {
            Dictionary<string, string> items = null;
            string path = AppDomain.CurrentDomain.BaseDirectory;
            try
            {
                using StreamReader reader = new StreamReader(path + "/appsettings.json");
                string json = reader.ReadToEnd();
                items = Newtonsoft.Json.JsonConvert.DeserializeObject<Dictionary<string, string>>(json);
            }
            catch (Exception ex)
            {
                Console.WriteLine(ex);
            }
            return items;
        }
    }
    public class Appsettings
    {
        public static Dictionary<string, string> appsettings = Settings.GetData();
    }
}
In the above code, we have a function called GetData() which will fetch the data from appsettings.json in the form of a dictionary. Further, we have to call that function. For doing this, we have created another class called Appsettings and we have called the Settings.GetData() function from there. The dictionary output from GetData() is stored in a dictionary called appsettings.
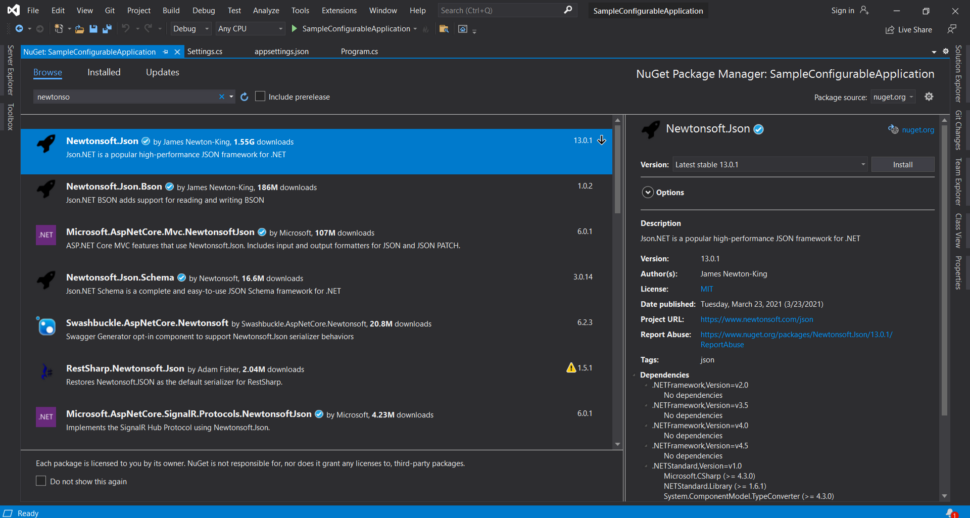
Now, for this code to work, you have to install a NuGet package called Newtonsoft.Json. For doing this, right click on your project in the Solution Explorer and click on ‘Manage NuGet Packages…’
Further, search for Newtonsoft.Json in the Browse section and install the latest version.
STEP 5 : Using the values from appsettings in our code
The last and the final step is to use these values in our code. So, we will use these values in our Program.cs file, which contains the Main() function. For accomplishing the same, copy the code below in the Program.cs file.
using System;

namespace SampleConfigurableApplication
{
    class Program
    {
        static void Main(string[] args)
        {
            Console.WriteLine("Hello!!");
            Console.WriteLine("I am " + Appsettings.appsettings["Name"] + " and I am " + Appsettings.appsettings["Age"] + " years old");
            Console.WriteLine("Contact me at " + Appsettings.appsettings["Email"]);
        }
    }
}
Conclusion and Output
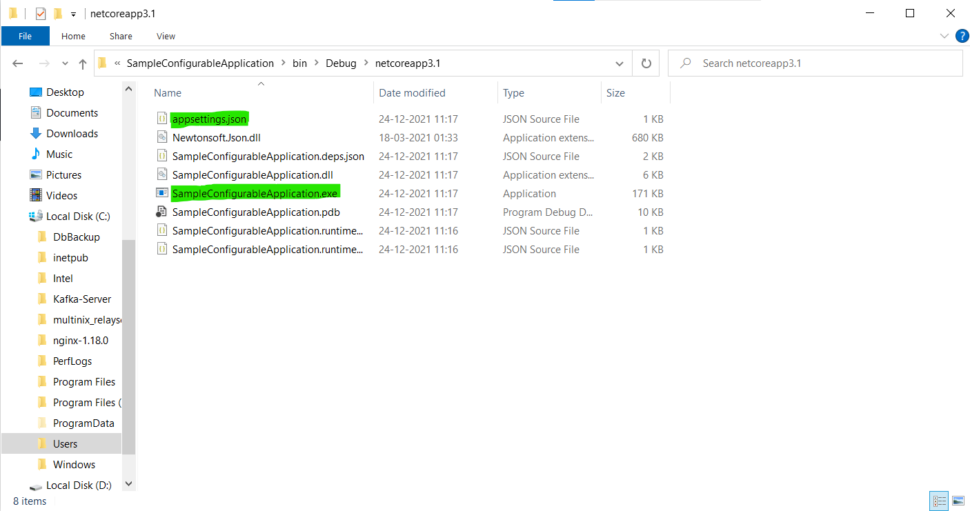
Hurray!! This completes our application. Since we completed our application, we can build it and see how exactly we can configure this application during run time. Let’s not waste time further, go ahead and build the application. Once the application gets built, we can find the appsettings.json file even in the bin folder, where the built .dll files and .pdp files are stored. So, if you have to deploy your application anywhere else, you just have to copy the bin folder there and give the required values to the keys in the appsettings.json and run the .exe file, which is also in the same folder.
Let’s see what the built directory would look like. As you can see, appsettings.json and the.exe file are here. So, you can execute the .exe file from the command prompt and see the output. You can as well change the values in the appsettings.json here in the bin folder and run the .exe file to see if the output changes.
Let’s go ahead and see the output
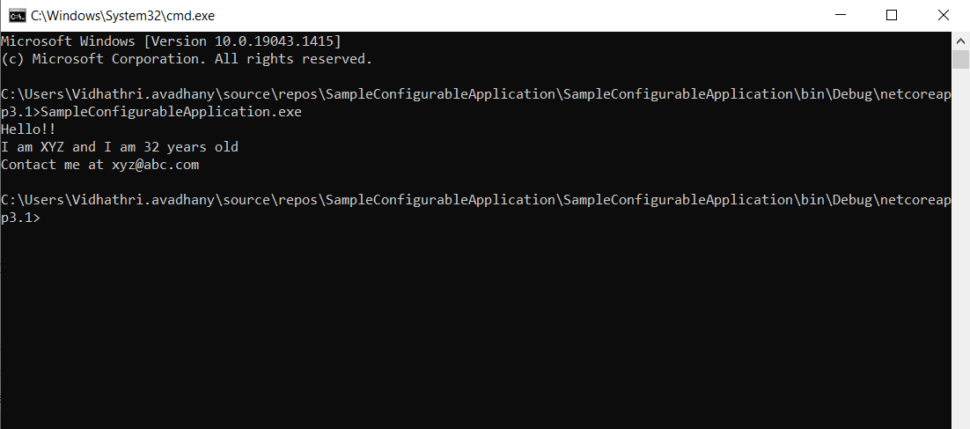
That’s it folks!!! We have completed our application here. Thank you for reading my blog. Do let me know how you feel about it in the comment section.
January 3, 2022Nice blog! Simple and easy to follow!
Vidhathri Avadhany –
January 6, 2022thank you!!
January 5, 2022Very well written!
Vidhathri Avadhany –
January 6, 2022thank you
January 5, 2022Very informative. Steps have been explained in detail and code is very clean and refactored very well.
Vidhathri Avadhany –
January 6, 2022Thank you for your response