
In the previous blog, we discussed creating a sample HiveMQ extension project. Now to move forward, In this blog we will learn how to do custom authentication in HiveMQ using the extension.
Authentication can be termed as a process that verifies the identity of a person or a device. When we login into a website, we typically input a username and password. By providing accurate login information, the website is able to determine first who we are and that we are the one who is accessing the site.
First, we need to have a basic project for the HiveMQ extension. If we don’t have one we can create our own basic project as discussed in How to create a custom HiveMQ extension?
By default, MQTT does not provide any way to authenticate users from a database or API. We can achieve the same by using the custom extension.
The steps to create our own custom extension :
- First we create a new java class and implement SimpleAuthenticator
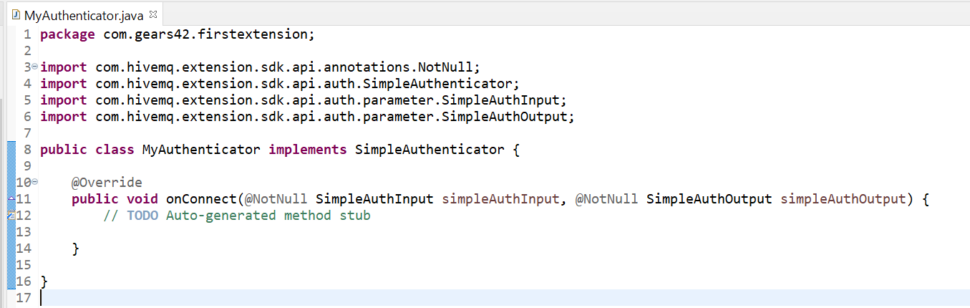
- Add the below method, which will call the API and check if the given credentials are valid or not.
public static Boolean isAuthorizedUser(String uname, String pwd) {
    	try {

    		String data = "{"+uname+":"+pwd+"}";

			URL weburl = new URL("YOUR API URL");
			HttpURLConnection conn = (HttpURLConnection) weburl.openConnection();
			conn.setRequestMethod("POST");
			conn.setRequestProperty("Accept", "application/json");
			conn.getOutputStream().write(data.getBytes("UTF-8"));


			if (conn.getResponseCode() == 200) {
				BufferedReader br = new BufferedReader(new InputStreamReader((conn.getInputStream())));
				StringBuilder sb = new StringBuilder();
				String output;
				while ((output = br.readLine()) != null) {
					sb.append(output);
				}
				return Boolean.parseBoolean(sb.toString());
			}
    	} catch(Exception e) {
    		System.out.println("API Error");
    	}
    	return null;

	}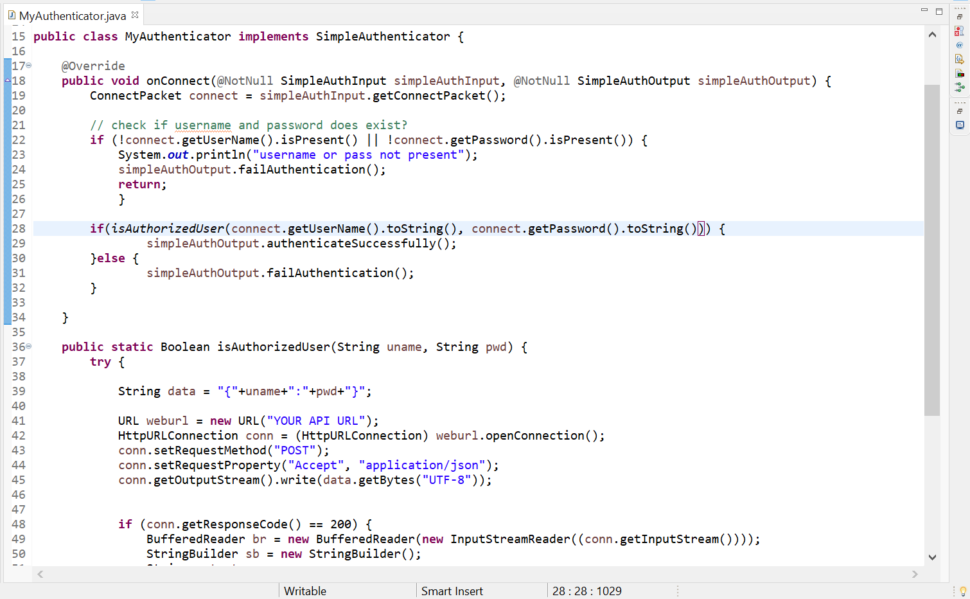
- We have to add the below code inside the onConnect method:
ConnectPacket connect = simpleAuthInput.getConnectPacket();

// check if username and password does exist?
if (!connect.getUserName().isPresent() || !connect.getPassword().isPresent()) {
	System.out.println("username or pass not present");
	simpleAuthOutput.failAuthentication();
	return;
	}

if(isAuthorizedUser(connect.getUserName().toString(), connect.getPassword().toString())) {
		simpleAuthOutput.authenticateSuccessfully();
}else {
		simpleAuthOutput.failAuthentication();
}- Next we have to create a new java class which implements
AuthenticatorProviderand then add the below code:
return new MyAuthenticator();
- Lastly we have to add the code given below inside the extensionStart method of the main class:
Services.securityRegistry().setAuthenticatorProvider(new MyAuthenticatorProvider());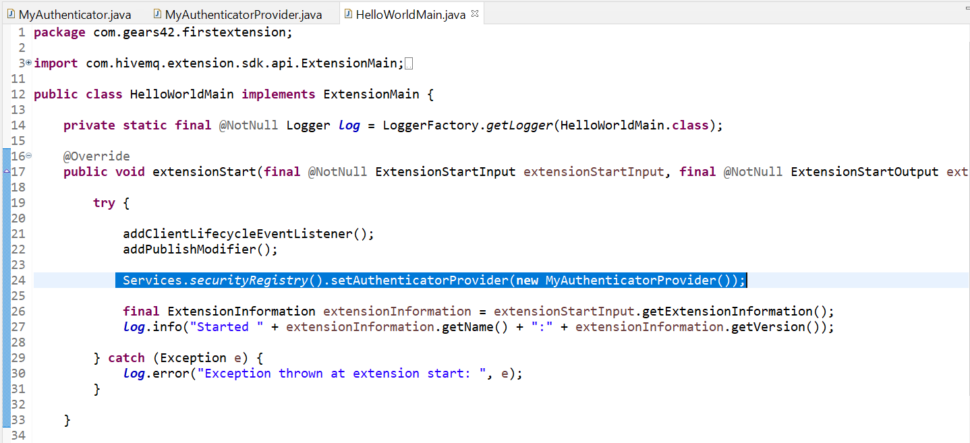
Our basic authentication using an API is done. To improve the authentication process we can store the data to be authenticated in cache memory which prevents multiple calls to the server.
In the next blog, we will learn about authorization in HiveMq using extensions. Stay tuned!