
Minio Storage :
Minio is an open source object storage server that stores unstructured data such as photos, videos, log files, backups, and container/VM images. It is a lightweight, reliable, and secure alternative to hosting large amounts of data on distributed network drives or in the cloud. Minio is a cloud storage service that offers a simple and cost-effective way to store and serve large amounts of data. It is compatible with Amazon S3 and is ideal for storing and serving large amounts of data for applications such as data lakes, machine learning, analytics, video and audio streaming, web and mobile applications, and more. Minio has features such as server-side encryption, versioning, and secure access control.
Follow the below-mentioned steps to set up MinIO server in Ubuntu machine :
- Download and Install MinIO by running the following commands:
Command: wget https://dl.min.io/server/minio/release/linux-amd64/minio.RELEASE.2025-09-07T16-13-09Z -O minio
Command: sudo mv minio /usr/local/bin/
Command: sudo chmod +x /usr/local/bin/minio - Create the MinIO User, Group, Data Directory, and Environment File:
Command: sudo groupadd -r minio-user - Create the user that the MinIO server will run as:
Command: sudo useradd -M -r -g minio-user minio-user - Create the data directory where MinIO will store all its files with the following command:
Command: sudo mkdir /mnt/data - Give ownership of the data directory to the MinIO user and group:
Command: sudo chown minio-user:minio-user /mnt/data
Command: sudo chmod 777 /mnt
Command: sudo chmod 777 /mnt/data - Use the following command to create and open MinIO’s environment file:
Command: sudo nano /etc/default/minio - Provide the below-mentioned details in the MinIO environment file and save it:
MINIO_VOLUMES="/mnt/data"
MINIO_OPTS="–certs-dir /home/<machine_username>/.minio/certs –console-address:9001"
MINIO_ROOT_USER=minio-user
MINIO_ROOT_PASSWORD=minio123 - Create minio service file and provide the details mentioned below:
Command: sudo nano /etc/systemd/system/minio.service[Unit]
Description=MinIO
Documentation=https://docs.min.io
Wants=network-online.target
After=network-online.target
[Service]
User=minio-user
Group=minio-user
EnvironmentFile=/etc/default/minio
ExecStart=/usr/local/bin/minio server $MINIO_OPTS $MINIO_VOLUMES
Restart=always
LimitNOFILE=65536
TimeoutStopSec=5
[Install]
WantedBy=multi-user.target - Start the MinIO service by running the following command:
Command: sudo systemctl daemon-reload
Command: sudo systemctl start minio.service - Check the status of the MinIO service by running the following command:
Command: sudo systemctl status minio.service
Note: If MinIO fails then run journalctl -f -u minio.service to get the service logs.
Once the MinIO service is in the running state, access the MinIO console with the private IP of the machine <private ip:9001>.
Set up NGINX for the MinIO server :
Nginx (pronounced “engine-x”) is a web server that is used to serve web pages and other content on the World Wide Web. It is an open source web server software that is used to handle high traffic websites due to its scalability and performance. Nginx is noted for its ability to handle multiple simultaneous requests, as well as its speed and low memory usage. It is often used as a reverse proxy, load balancer, and HTTP cache. It can also be used to serve static content such as images, CSS and Javascript files.
To install Nginx, use the following command:
sudo apt update
sudo apt install nginx
Create a directory to place SSL certificates at /etc/nginx:
sudo mkdir certs
Place SSL certificates at /etc/nginx/certs
Configure NGINX file with port 81.Navigate to /etc/nginx and edit nginx.conf file as mentioned below:
user www-data;
worker_processes auto;
pid /run/nginx.pid;
include /etc/nginx/modules-enabled/*.conf;

events {
        worker_connections 768;
        # multi_accept on;
}

http {

        ##
        # Basic Settings
        ##

        sendfile on;
        tcp_nopush on;
        tcp_nodelay on;
        keepalive_timeout 65;
        types_hash_max_size 2048;
        # server_tokens off;

        # server_names_hash_bucket_size 64;
        # server_name_in_redirect off;

        include /etc/nginx/mime.types;
        default_type application/octet-stream;

        ##
        # SSL Settings
        ##

        ssl_protocols TLSv1 TLSv1.1 TLSv1.2 TLSv1.3; # Dropping SSLv3, ref: POODLE
        ssl_prefer_server_ciphers on;

        ##
        # Logging Settings
        ##

        access_log /var/log/nginx/access.log;
        error_log /var/log/nginx/error.log;

        ##
        # Gzip Settings
        ##

        gzip on;

        # gzip_vary on;
        # gzip_proxied any;
        # gzip_comp_level 6;
        # gzip_buffers 16 8k;
        # gzip_http_version 1.1;
        # gzip_types text/plain text/css application/json application/javascript text/xml application/xml application/xml+rss text/javascript;

        ##
        # Virtual Host Configs
        ##

        include /etc/nginx/conf.d/*.conf;
        include /etc/nginx/sites-enabled/*;
        server {
                listen <PORT> ssl;
                server_name  <MinIO server URL>;
                ssl_certificate      <Path to ssl certificate file>;
                ssl_certificate_key  <Path to ssl certificate key>;
                ssl_protocols TLSv1.2 TLSv1.3;
                ssl_ciphers 'ECDHE-ECDSA-AES128-GCM-SHA256:ECDHE-RSA-AES128-GCM-SHA256:ECDHE-ECDSA-AES256-GCM-SHA384:ECDHE-RSA-AES256-GCM-SHA384:ECDHE-ECDSA-CHACHA20-POLY1305:ECDHE-RSA-CHACHA20-POLY1305:DHE-RSA-AES128-GCM-SHA256:DHE-RSA-AES256-GCM-SHA384:DHE-RSA-CHACHA20-POLY1305:ECDHE-ECDSA-AES128-SHA256:ECDHE-RSA-AES128-SHA256:ECDHE-ECDSA-AES128-SHA:ECDHE-RSA-AES128-SHA:ECDHE-ECDSA-AES256-SHA384:ECDHE-RSA-AES256-SHA384:ECDHE-ECDSA-AES256-SHA:ECDHE-RSA-AES256-SHA:DHE-RSA-AES128-SHA256:DHE-RSA-AES256-SHA256:AES128-GCM-SHA256:AES256-GCM-SHA384:AES128-SHA256:AES256-SHA256:AES128-SHA:AES256-SHA:DES-CBC3-SHA';

         ssl_prefer_server_ciphers on;
        charset utf-8;
                 # To allow special characters in headers
        ignore_invalid_headers off;
         # Allow any size file to be uploaded.
         # Set to a value such as 1000m; to restrict file size to a specific value
        client_max_body_size 0;
         # To disable buffering
        proxy_buffering off;

                location / {
                        proxy_set_header X-Real-IP $remote_addr;
                        proxy_set_header X-Forwarded-For $proxy_add_x_forwarded_for;
                        proxy_set_header X-Forwarded-Proto $scheme;
                        proxy_set_header Host $http_host;

                        proxy_connect_timeout 300;
                        # Default is HTTP/1, keepalive is only enabled in HTTP/1.1
                        proxy_http_version 1.1;
                        proxy_set_header Connection "";
                        chunked_transfer_encoding off;

                        proxy_pass http://localhost:9000;
                }

    }
}


#mail {
#       # See sample authentication script at:
#       # http://wiki.nginx.org/ImapAuthenticateWithApachePhpScript
#
#       # auth_http localhost/auth.php;
#       # pop3_capabilities "TOP" "USER";
#       # imap_capabilities "IMAP4rev1" "UIDPLUS";
#
#       server {
#               listen     localhost:110;
#               protocol   pop3;
#               proxy      on;
#       }
#
#       server {
#               listen     localhost:143;
#               protocol   imap;
#               proxy      on;
#       }
#}
Note : If http is blocked inside the server and system admins face error Client sent an HTTP request to an HTTPS server then change proxy_pass value to  https://localhost:9000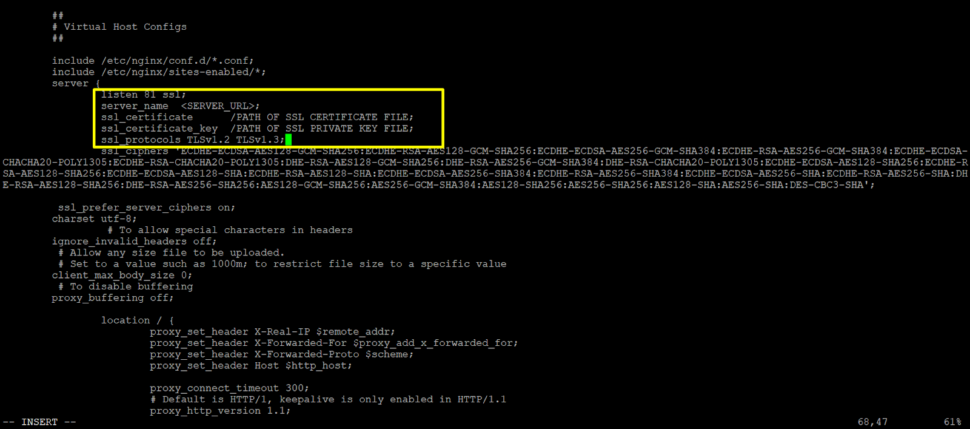
Save the changes and restart NGINX.
Now users can use https://server_url:81 as a MinIO server URL.